Initially, I prepared a detailed step-by-step guide on how to install and configure the WireGuard server. However, in the process of using it, it became clear that WireGuard is not ideal for complex configurations, it is often blocked by ISPs, and it does not support TCP. WireGuard is easily detected by ISPs because it was not originally designed to bypass blocking. At the same time, for simple tasks, such as breaking through a firewall in a corporate network or creating a private VPN server, WireGuard is perfect due to its easy setup.
Setting up a WireGuard server requires manually creating keys, selecting a subnet and setting a few parameters. You also need to create keys and configuration files for each client, which is inconvenient if you have a large number of users or need to change clients frequently.
As they say before you do it yourself, look at what has already been done before you. The task of automating these actions can be solved with the help of special programs. After analyzing the available solutions on the Internet for Wireguard server installation, I have identified 3 automatic solutions for WireGuard server installation.
What is WireGuard
WireGuard is a modern VPN protocol characterized by high speed and the use of advanced cryptographic algorithms. Compared to IPsec and OpenVPN, it is easier to configure and more versatile, which allows its wide application in various scenarios. The developers describe WireGuard as a simple and fast state-of-the-art VPN without too much complexity. WireGuard aims to be faster, more compact and more efficient than IPsec (it’s hard to create something worse than IPsec) and OpenVPN, aiming for high performance.
Wireguard is a peer-to-peer VPN, meaning it doesn’t use a client-server model. Depending on the configuration, a peer-to-peer node can act as a traditional server or client. It works by creating a network interface on each peer device that acts as a tunnel. The peer nodes authenticate each other by exchanging and verifying public keys, mimicking the SSH model. The public keys are matched against a list of IP addresses allowed in the tunnel. VPN traffic is encapsulated in UDP.
WireGuard encryption is based on public and private keys that allow peer hosts to establish an encrypted tunnel between each other. Each version of WireGuard uses a specific set of cryptographic ciphers to ensure simplicity, security, and compatibility with peer nodes. In comparison, other VPN software such as OpenVPN and IPSec uses Transport Layer Security (TLS) and certificates for authentication, which makes setting up a VPN that uses TLS more time-consuming, complex, and error-prone.
Advantages and Disadvantages of VPN by WireGuard
Advantages:
Disadvantages:
Requirements, choosing a VPS
To select a VPS provider for a VPN server, it is important to consider several key criteria: availability of server locations around the world, IPv6 support and high connection speed. Companies such as Aéza and PQ hosting offer a wide range of geographic regions to host servers in, allowing for optimized connections for users in different parts of the world. IPv6 support is important to ensure modern networking standards.
To follow this guide you will need:
To follow this guide you will need:
Solution 1: WireGuard installer for personal use without the web
The WireGuard installer by angristan comes first, because he proved his professionalism by creating a script for OpenVPN deployment earlier, we reviewed it in the article OpenVPN for housewives in 5 minutes on any Linux.
Pros:
- ENDPOINT $IP instead of ip address you can spell out a domain,
- IPv6 support out of the box,
- QR code (can be viewed in Linux console).
- OS support: AlmaLinux >= 8, Arch Linux, CentOS Stream >= 8, Debian >= 10, Fedora >= 32, Oracle Linux, Rocky Linux >= 8, Ubuntu >= 18.04.
Cons:
- User management via command line, which is not always convenient.
Download and run the script. Answer the questions posed by the script and it will take care of the rest.
curl -O https://raw.githubusercontent.com/angristan/wireguard-install/master/wireguard-install.sh
chmod +x wireguard-install.sh
./wireguard-install.sh
Welcome to the WireGuard installer!
The git repository is available at: https://github.com/angristan/wireguard-install
I need to ask you a few questions before starting the setup.
You can keep the default options and just press enter if you are ok with them.
IPv4 or IPv6 public address: xxx.xxx.xxx.xxx
Public interface: ens3
WireGuard interface name: wg0
Server WireGuard IPv4: 10.66.66.1
Server WireGuard IPv6: fd42:42:42::1
Server WireGuard port [1-65535]: 50245
First DNS resolver to use for the clients: 1.1.1.1
Second DNS resolver to use for the clients (optional): 1.0.0.1
WireGuard uses a parameter called AllowedIPs to determine what is routed over the VPN.
Allowed IPs list for generated clients (leave default to route everything): 0.0.0.0/0,::/0
Press any key to continue...Management after installing the script by calling the same file wireguard-install.sh in the console. To add a new user, follow the pseudo-menu prompts:
./wireguard-install.sh

What do you want to do?
   1) Add a new user
   2) List all users
   3) Revoke existing user
   4) Uninstall WireGuard
   5) Exit
Select an option [1-5]:
A configuration file with the prefix wg0-client for the client will be created next to the wireguard-install.sh file to be run. The QR code is displayed in the console immediately after the client is created.
To recreate the QR code of an existing client, use the qrencode utility. In the command below, replace the name of the wg0-client-test1.conf file with the client file you want:
qrencode -t ansiutf8 -l L < wg0-client-test1.confDone! You have a working VPN server based on WireGuard.
Solution 2: WireGuard-UI for personal use with web interface
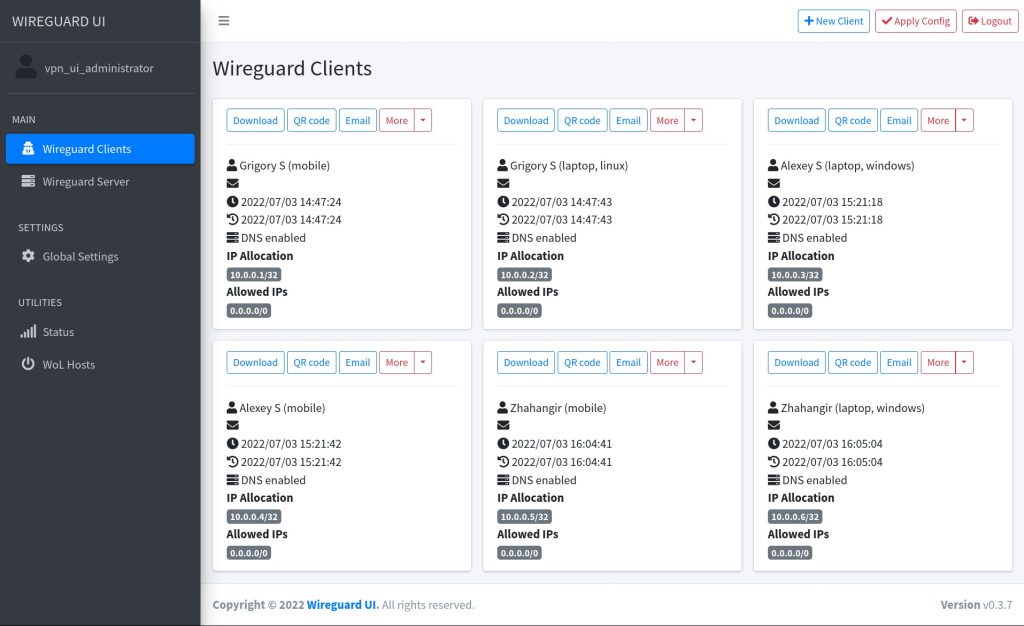
WireGuard-UI is a web-based WireGuard management interface that simplifies the configuration and administration of the WireGuard VPN server. This interface allows users without in-depth command line knowledge to easily configure and manage the WireGuard server.
The main functions of the WireGuard-UI are:
- Provides an intuitive web interface for configuring and managing WireGuard.
- Simplifies adding, deleting, and managing client configurations.
- Generates and provides QR codes to quickly configure clients on mobile devices.
- Manage server settings such as IP addresses, ports and encryption keys.
- Visualize usage statistics, such as the amount of data transferred and active sessions.
Solution 3: Firezone for Enterprise Use
Firezone is a powerful VPN server management tool designed for enterprise use. It simplifies the deployment and management of WireGuard VPN through a user-friendly web interface.
Firezone’s main features are:
- Ideal for companies, providing secure and scalable VPN management.
- All components, including WireGuard, run in Docker containers for easy installation and maintenance.
- Uses Caddy to automatically configure HTTPS, which provides a secure connection to the web interface.
- Supports IPv6 out of the box, making Firezone relevant to modern networks.
- No need to manually create configuration files for each user. An administrator can create a user account and the user can generate their own configurations via the web interface.
Firezone collects telemetry to improve development, but this can be disabled during installation or later via the TELEMETRY_ENABLED environment variable.
Configuring Wireguard clients
For all instructions, you will need a configuration file or QR code from the WireGuard server administrator. Download WireGuard clients for any supported platform at: https://wireguard.com/install/.
The configuration file contains the settings for connecting to the server. This file is convenient because you can simply import it into the application and it will automatically configure itself.
It is recommended to have a separate config file for each device. If you use the same config to connect from multiple devices, there may be a conflict that causes at least one of the devices to fail to connect.
Windows
- Download and install the Windows package from the WireGuard website.
- After installation, open the WireGuard application and click “Import tunnel(s) from file” and select the configuration file.
- Make sure you have a DNS setting in your config. Without this, the tunnel in Windows will not work properly. In the Wireguard application, click the “Edit” button and in the Interface block there should be a DNS setting. If it is there, you don’t need to change anything. If not, after the Address line, add the line DNS = 8.8.8.8.8, 1.1.1.1.1.
Linux Ubuntu Debian
sudo apt install wireguardAfter that, create a client configuration file
nano /etc/wireguard/wg0.confEnter the following command to start the connection:
sudo wg-quick up wg0If you want the WireGuard connection to be established automatically at system startup, add wg-quick to the autoloader:
systemctl enable [email protected]Most solutions have a line with DNS servers in the configs they create DNS = $DNS1, $DNS2. This line is mandatory for macOS, iOS and Windows and works there without any problems. But in Linux it’s not so simple. The problem is that wg-quick uses resolvconf to manage DNS and does not support system-resolved, which is used almost everywhere. To solve this problem, you can remove this DNS string from the client configuration file. This will use the system DNS, such as the DNS server on your home router.
Android
- Download the Wireguard app from Google Store, it is also available in F-Droid.
- Now you need to open the app and add the config. In the app, click on the plus button and select “Scan QR code” or “Import from file or archive” option
FAQ 1: How do I limit the number of connections per key in WireGuard Server?
The restriction is done with ip addresses using classless CIDR addressing.
Configure wg0.conf on the server:
[Peer]
PublicKey = <publickey peer1>
AllowedIPs = 10.0.0.2/30
Instead of AllowedIPs = 10.0.0.0.2/32 you can make AllowedIPs = 10.0.0.2/30. Write it in the client config:
[Interface]
PrivateKey = <privatekey peer 1>
Address = 10.0.0.2/30
In this example, 4 devices are allowed to connect.
FAQ 2: Wireguard debug
wg show all dump
FAQ 3: What Linux kernel settings are required for Wireguard server
If you install Wireguard using the scripts described above, they will add the necessary settings to the /etc/sysctl.conf file themselves. For WireGuard to work optimally on a Linux server, certain kernel settings may be required to support the necessary networking features and improve performance. Here are the main settings to consider:
Enable IP Forwarding. WireGuard requires IP Forwarding to be enabled to route traffic between clients and the server.
net.ipv4.ip_forward = 1
net.ipv6.conf.all.forwarding = 1
Protect against DoS attacks and improve security. Settings to limit SYN flood attacks. If your VPN server is running normally, the load on the server is not high – disable net.ipv4.tcp_syncookies by setting the parameter 0.
net.ipv4.tcp_syncookies = 1The entire list of possible Linux kernel settings:
kernel.apparmor_restrict_unprivileged_userns = 1
kernel.printk = 4 4 1 7
net.ipv6.conf.all.use_tempaddr = 2
net.ipv6.conf.default.use_tempaddr = 2
kernel.kptr_restrict = 1
kernel.sysrq = 176
vm.max_map_count = 1048576
net.ipv4.conf.default.rp_filter = 2
net.ipv4.conf.all.rp_filter = 2
kernel.yama.ptrace_scope = 1
vm.mmap_min_addr = 65536
kernel.pid_max = 4194304
fs.protected_fifos = 1
fs.protected_hardlinks = 1
fs.protected_regular = 2
fs.protected_symlinks = 1
net.ipv4.tcp_syncookies = 0
net.ipv4.tcp_congestion_control = bbr
net.ipv4.ip_forward = 1
net.ipv6.conf.all.forwarding = 1
net.ipv4.tcp_congestion_control = bbrFAQ 4: Can WireGuard bypass firewalls?
The WireGuard protocol should normally bypass firewall blocking, but there is one problem – since the protocol only uses the UDP transmission protocol (it is hard to say which port, although it could be port 51820), there is a chance that it could be blocked by firewalls or network administrators that disable UDP altogether and only allow TCP traffic.
If you have the time and desire, it is recommended that you investigate tools such as Shadowsocks and XRay (or other solutions masquerading as HTTPS). You can install them together with WireGuard for increased flexibility and security.
FAQ 5: How to forward a network of IP addresses to a client in WireGuard?
If you want devices behind the client to be able to use the VPN connection to access server resources, you need to do a network forwarding. To forward a network of IP addresses behind the client in WireGuard, you need to configure traffic routing through the client interface.
Let’s assume that the network behind the client is 192.168.2.0/24 and we need to make it available to other IPs on our WireGuard network.
In the case of forwarding gray IP addresses (private IP addresses), MASQUERADE on the client may be unnecessary if all devices and routes are configured correctly. In this case, it is enough to configure the correct routes on the WireGuard server and client.
WireGuard server configuration:
- Open the configuration file of the WireGuard server. Add the 192.168.2.0/24 client network to the [Peer] section, AllowedIPs line:
sudo nano /etc/wireguard/wg0.conf

[Interface].
PrivateKey = <server_private_key>
Address = 10.0.0.1/24
ListenPort = 51820

[Peer]
PublicKey = <client_public_key>
AllowedIPs = 10.0.0.0.2/32, 192.168.2.0/24- Configure routing on the server. Check that you have a new route on the server or add it manually. Add a route to the network behind the client:
sudo ip route add 192.168.2.0/24 dev wg0Configuring the WireGuard client:
- Open the WireGuard client configuration file. Add a route to the network behind the client:
[Interface].
PrivateKey = <client_private_key>
Address = 10.0.0.2/24

[Peer]
PublicKey = <public_server_key>
Endpoint = <server_address>:51820
AllowedIPs = 10.0.0.0.0/24, 0.0.0.0.0/0
In this case, 0.0.0.0.0/0 means that all traffic will be routed through the VPN. If you only want to forward specific networks, specify them in AllowedIPs.
- Configure routing on the client. Enable IP forwarding on the client, Linux example:
sudo sysctl -w net.ipv4.ip_forward=1- Configure iptables rules on the client to forward traffic:
sudo iptables -t nat -A POSTROUTING -s 192.168.2.0/24 -o wg0 -j MASQUERADEThese steps will help you configure IP address network forwarding behind the client in WireGuard, allowing traffic to be routed through the VPN to devices behind the client.
Conclusion
Despite some limitations, such as the lack of TCP support and the possibility of ISP blocking, WireGuard remains an excellent choice for personal use and simple corporate tasks. Due to its speed, ease of use and use of advanced cryptographic algorithms, WireGuard is becoming increasingly popular in the IT professional community.
Utilizing automated solutions to install and manage WireGuard can greatly simplify the process and save time, especially in cases where a large number of clients need to be managed. We recommend taking a look at our directory of VPN providers. We hope that the tips and tools provided will help you effectively configure and use WireGuard VPN on your network.
This article will be updated as you use it, so please add it to your bookmarks. If you have any suggestions or additions to this tutorial, please leave them in the comments.